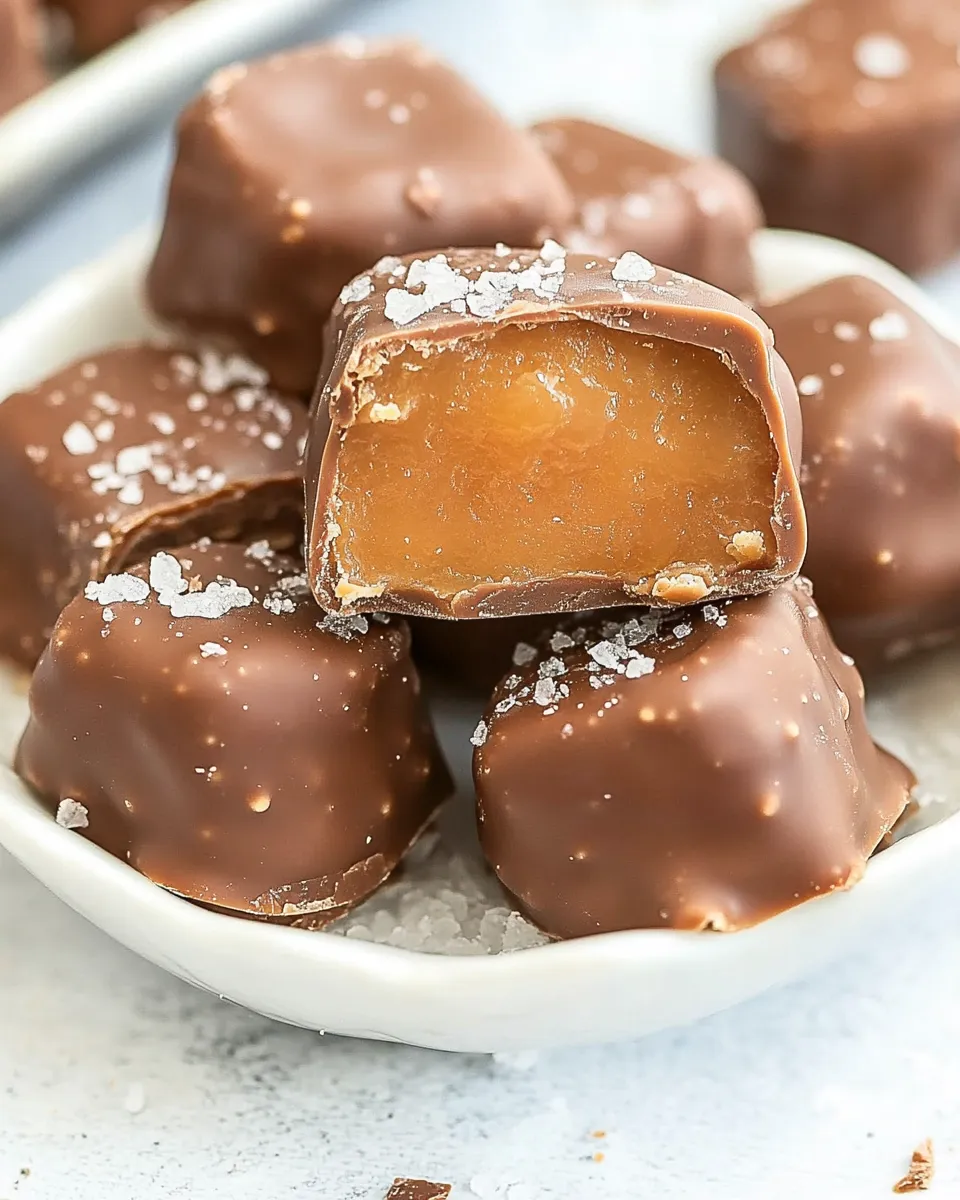
Salted Chocolate Covered Caramels
Indulging in the delightful world of homemade treats is one of the sweetest joys in life, and nothing quite captures that bliss like Salted Chocolate Covered Caramels. These little bites of heaven combine the rich, buttery flavor of soft caramel with the indulgent melt of high-quality chocolate, all topped with a sprinkle of sea salt. Perfect for gifting, sharing, or simply enjoying on your own, this recipe transforms simple ingredients into an irresistible delicacy that will have everyone coming back for more.
Imagine sinking your teeth into a soft, chewy caramel, only to be met with a luscious chocolate coating that melts in your mouth, followed by the satisfying crunch of sea salt. Whether you’re a seasoned candy maker or a novice in the kitchen, these salted chocolate covered caramels are surprisingly easy to whip up and will impress anyone fortunate enough to taste them.
Top Reasons to Make Salted Chocolate Covered Caramels

- Decadence at Home: Creating these caramels at home means you can enjoy a decadent treat without the high price of gourmet candy shops.
- Gift-Worthy: Wrap them up in a beautiful box, and you have a thoughtful, homemade gift perfect for any occasion.
- Customizable: Feel free to experiment with different types of chocolate or add flavors like vanilla or espresso to the caramel for a unique twist.
- Simple Ingredients: With just a few quality ingredients, you can create something truly special.
- Family Fun: Making these caramels can be a fun activity to share with family or friends, creating lasting memories in the kitchen.
What to Buy
To make your own Salted Chocolate Covered Caramels, gather these ingredients:
- 1 batch homemade soft caramels: This will yield about 80 bite-sized caramels. Choose a reliable recipe or use your favorite method.
- 67 ounces Hershey’s chocolate bars: Opt for a high-quality chocolate bar that melts well. Dark chocolate, milk chocolate, or semi-sweet chocolate are all great choices!
- Sea salt: This will be used for topping the finished caramels, adding that perfect touch of salty contrast to the sweet chocolate and caramel.
Gear Checklist
To ensure a smooth caramels-making experience, gather the following gear:
- Heavy-bottomed saucepan: Essential for even heating while making your caramel.
- Wooden spoon or silicone spatula: Perfect for stirring and preventing the caramel from burning.
- Chocolate melting bowl: A heatproof bowl for melting your chocolate.
- Parchment paper: For lining your baking sheet and allowing the caramels to cool without sticking.
- Candy thermometer: Helps you achieve the perfect consistency for your caramel.
- Cookie sheet: To lay your dipped caramels on as they cool and set.
Salted Chocolate Covered Caramels: From Prep to Plate

Making your own Salted Chocolate Covered Caramels is a rewarding and enjoyable process. Follow these steps for a delightful treat:
Step 1: Prepare Your Caramel
Start by making a batch of homemade soft caramels. Use your favorite recipe and ensure it reaches the soft ball stage (around 234-240°F) on the candy thermometer. Once ready, pour the mixture onto a parchment-lined baking sheet to cool completely.
Step 2: Cut the Caramels
Once the caramel has cooled and set, use a sharp knife to cut it into bite-sized pieces. You can make them as small or large as you prefer, but keep in mind that smaller pieces are easier to coat in chocolate.
Step 3: Melt the Chocolate
Break the Hershey’s chocolate bars into smaller pieces and place them in a heatproof bowl. Melt the chocolate over a double boiler or in the microwave in short intervals, stirring frequently to ensure a smooth consistency. If using the microwave, melt in 30-second bursts, stirring in between, until fully melted.
Step 4: Coat the Caramels
Using a fork or chocolate dipping tool, dip each caramel piece into the melted chocolate, allowing any excess chocolate to drip off. Place the coated caramels back onto the parchment-lined cookie sheet.
Step 5: Add Sea Salt
Before the chocolate sets, sprinkle a small pinch of sea salt on top of each caramel. This will provide the perfect balance of sweet and salty flavors.
Step 6: Allow to Set
Let the chocolate-coated caramels sit at room temperature until the chocolate hardens. You can speed up the process by placing them in the refrigerator for a few minutes.
Step 7: Enjoy!
Once set, your Salted Chocolate Covered Caramels are ready to be enjoyed! Store them in an airtight container or gift them to friends and family.
Allergy-Friendly Substitutes

If you or your loved ones have dietary restrictions, consider these substitutes:
- Dairy-Free Chocolate: Use dairy-free chocolate bars or chips for a delicious vegan option.
- Nut-Free Caramel: Ensure that your caramel recipe does not include nuts if allergies are a concern.
- Gluten-Free: Both the chocolate and caramel can be made gluten-free, so check labels to ensure the products you choose are suitable.
- Alternative Sweeteners: For a lower-sugar option, try using coconut sugar or a sugar substitute in your caramel recipe.
Little Things that Matter
When making Salted Chocolate Covered Caramels, keep these tips in mind:
- Quality Ingredients: The flavor of your caramels hinges on the quality of the ingredients. Choose high-quality chocolate and fresh butter for the best results.
- Temperature Control: Be mindful of the temperature when making your caramel. Cooking it too quickly can lead to burnt sugar.
- Stay Organized: Set up your workspace before starting. Having everything ready will make the process smoother and more enjoyable.
- Patience is Key: Allow the chocolate to fully set before you dive in. It’s worth the wait for that perfect bite!
Meal Prep & Storage Notes
These Salted Chocolate Covered Caramels can be made ahead of time and stored for later enjoyment. Here are some tips:
- Storage: Keep the caramels in an airtight container at room temperature for up to two weeks. If you want to keep them longer, they can be refrigerated for up to a month.
- Freezing: You can also freeze the caramels for up to three months. Just ensure they are well-wrapped to prevent freezer burn.
- Layering: When storing multiple layers of caramels in a container, use parchment paper between layers to prevent sticking.
Reader Q&A
Can I use chocolate chips instead of chocolate bars?
Yes! Chocolate chips can work, but they often contain stabilizers that may not melt as smoothly. If you choose chocolate chips, opt for high-quality brands for better results.
What if my caramels are too hard?
If your caramels turn out too hard, it may be due to overcooking. To soften them, you can place them in a microwave-safe dish with a slice of bread or a damp paper towel for a few hours. The moisture from the bread will help soften the caramels.
Can I add flavors to the caramel?
Absolutely! You can infuse the caramel with flavors such as vanilla extract, sea salt, or even espresso powder. Just be cautious with strong flavors so that they don’t overpower the sweetness.
How do I prevent the chocolate from cracking?
To prevent the chocolate coating from cracking, ensure that the caramels are at room temperature before dipping them in chocolate. Additionally, tempering your chocolate can help achieve a nice shine and prevent cracking.
Final Bite
Salted Chocolate Covered Caramels are not just a treat; they are an experience. Each bite is a harmonious blend of textures and flavors that dance on your palate. The sweet, chewy caramel combined with the rich chocolate and a sprinkle of sea salt creates a symphony of taste that is simply irresistible. Whether you’re enjoying them as an afternoon snack, sharing them at a party, or gifting them to a loved one, these homemade delights are sure to bring smiles and satisfaction.
So, roll up your sleeves, gather your ingredients, and embark on this delicious journey of making your very own Salted Chocolate Covered Caramels. The rewarding feeling of creating something from scratch, combined with the joy of sharing it with others, is a sweet experience you won’t want to miss. Happy cooking!
Salted Chocolate Covered Caramels
Ingredients
Equipment
Method
- Step 1: Prepare Your Caramel - Start by making a batch of homemade soft caramels. Use your favorite recipe and ensure it reaches the soft ball stage (around 234-240°F) on the candy thermometer. Once ready, pour the mixture onto a parchment-lined baking sheet to cool completely.
- Step 2: Cut the Caramels - Once the caramel has cooled and set, use a sharp knife to cut it into bite-sized pieces. You can make them as small or large as you prefer, but keep in mind that smaller pieces are easier to coat in chocolate.
- Step 3: Melt the Chocolate - Break the Hershey's chocolate bars into smaller pieces and place them in a heatproof bowl. Melt the chocolate over a double boiler or in the microwave in short intervals, stirring frequently to ensure a smooth consistency.
- Step 4: Coat the Caramels - Using a fork or chocolate dipping tool, dip each caramel piece into the melted chocolate, allowing any excess chocolate to drip off. Place the coated caramels back onto the parchment-lined cookie sheet.
- Step 5: Add Sea Salt - Before the chocolate sets, sprinkle a small pinch of sea salt on top of each caramel. This will provide the perfect balance of sweet and salty flavors.
- Step 6: Allow to Set - Let the chocolate-coated caramels sit at room temperature until the chocolate hardens. You can speed up the process by placing them in the refrigerator for a few minutes.
- Step 7: Enjoy! - Once set, your Salted Chocolate Covered Caramels are ready to be enjoyed! Store them in an airtight container or gift them to friends and family.
Notes
- Use high-quality chocolate for the best melting and flavor.
- Allow caramels to cool completely before cutting for clean edges.
- Store in an airtight container to maintain freshness.