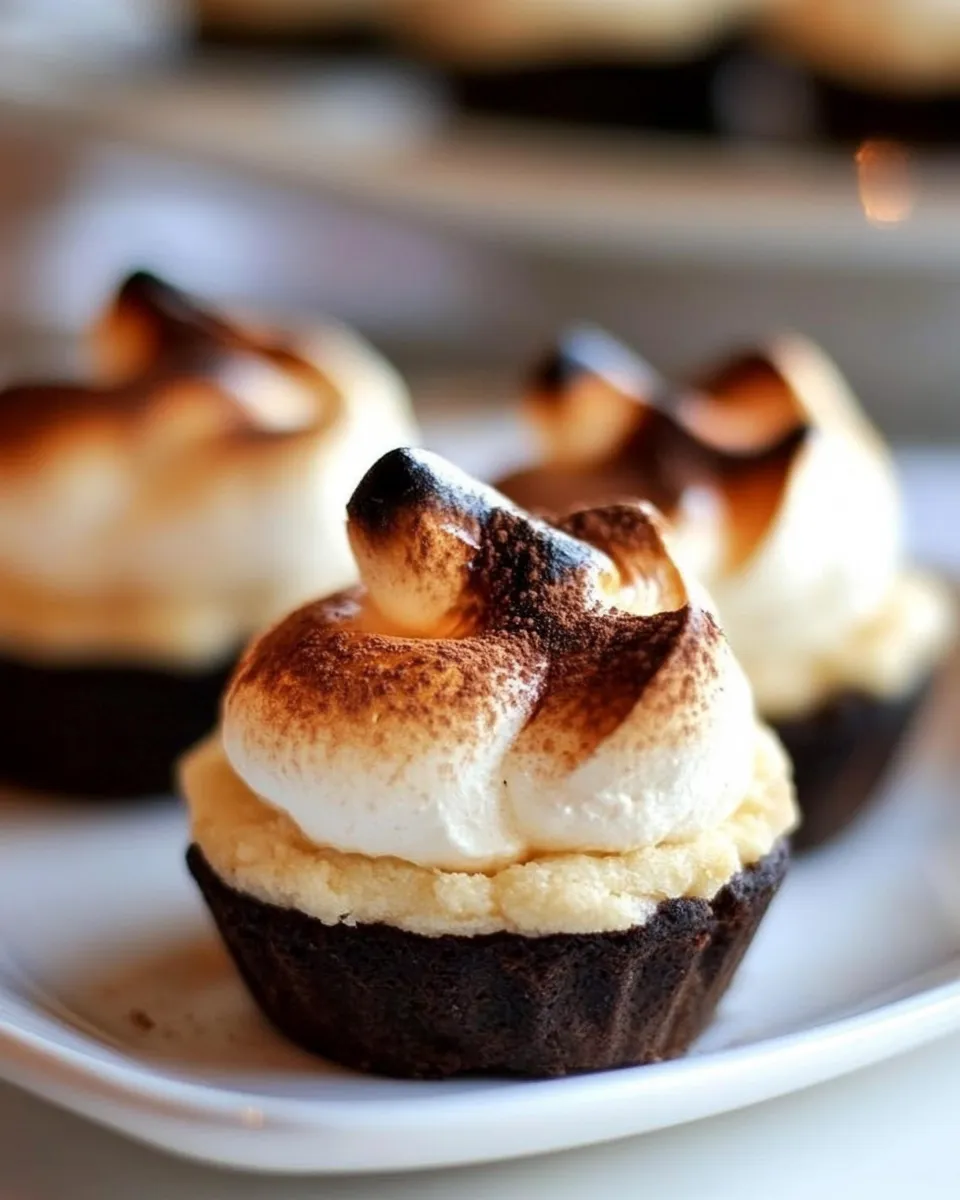
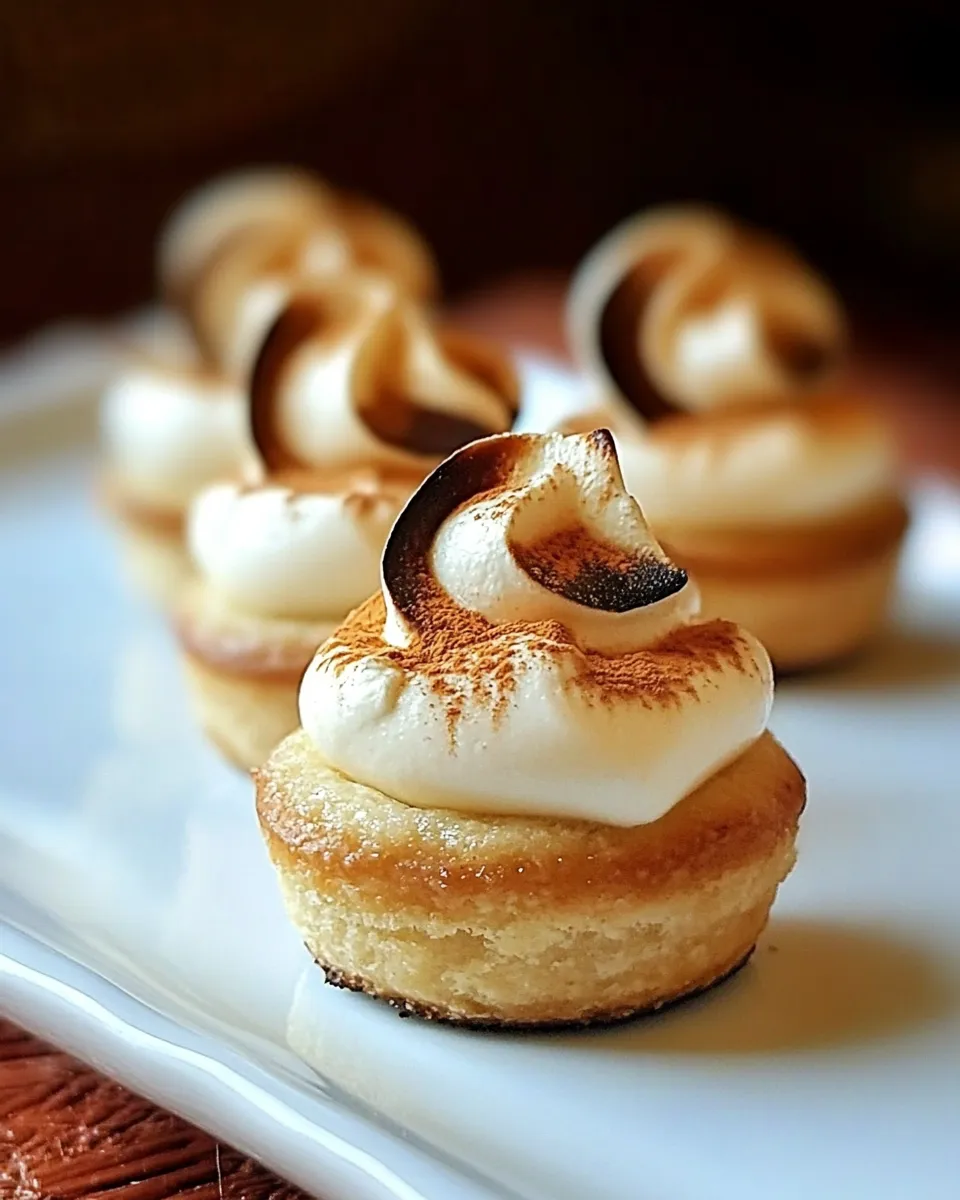
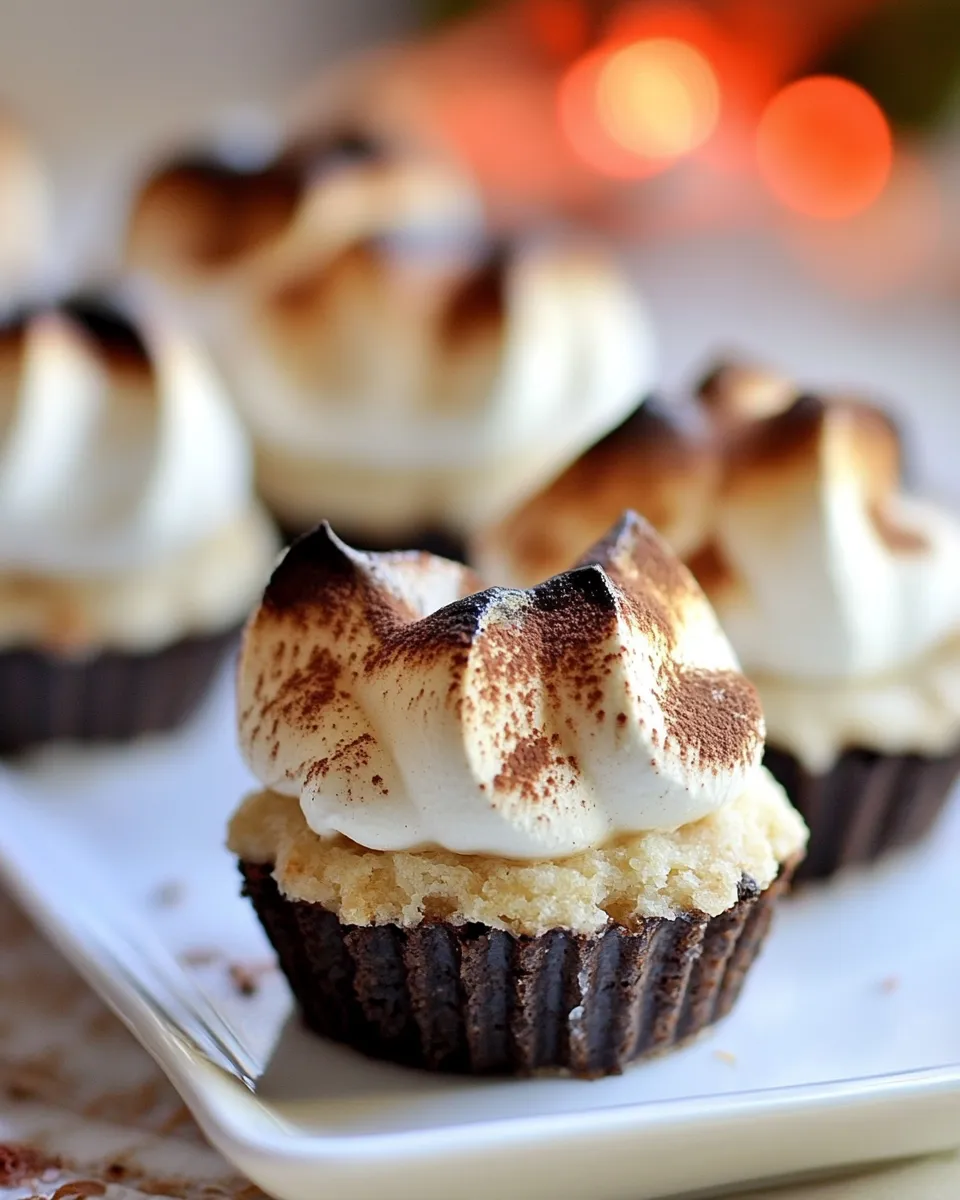
Gluten-Free Smores Tartlets
If you’re a fan of the classic campfire treat but need to adhere to a gluten-free diet, then these Gluten-Free Smores Tartlets are your new best friend. Imagine a delightful combination of a crunchy graham cracker crust, luscious chocolate filling, and a fluffy meringue topping, all baked to perfection. Not only do these tartlets satisfy that sweet tooth, but they also bring a nostalgic flavor to your dessert table. Let’s dive into why this recipe is a must-try and how you can whip them up in no time!
Why This Gluten-Free Smores Tartlets Stands Out
These Gluten-Free Smores Tartlets stand out for several reasons. First, they’re easy to make and use simple ingredients you likely already have on hand. The use of gluten-free graham crackers ensures that everyone can enjoy them, and the combination of dark chocolate and meringue adds an elegant touch. Plus, these tartlets can be served at any gathering, from summer barbecues to cozy winter evenings, making them a versatile dessert option.
Ingredient Checklist
- 4 oz gluten-free or reduced-fat graham crackers
- 2 tbsp dark brown sugar
- 3 tbsp whipped unsalted butter
- 8 oz 60% chocolate, chopped
- 3/4 cup canned fat-free evaporated milk
- 2 large eggs
- 1/4 cup sugar
- 2 tbsp water
- 1/4 cup egg whites, from 2 large eggs
- 1/8 tsp cream of tartar
- 1/2 tsp vanilla extract
Equipment & Tools
- Food processor or blender – for crushing the graham crackers.
- Mixing bowls – for combining ingredients.
- Whisk – for the meringue.
- Tartlet pans – for shaping the tartlets.
- Oven – for baking the tartlets.
- Double boiler or microwave-safe bowl – for melting the chocolate.
The Method for Gluten-Free Smores Tartlets

Step 1: Prepare the Crust
Begin by preheating your oven to 350°F (175°C). In a food processor, pulse the gluten-free graham crackers until they resemble fine crumbs. Transfer the crumbs to a mixing bowl and add the dark brown sugar and whipped unsalted butter. Mix until the mixture resembles wet sand.
Step 2: Form the Tartlet Shells
Press the graham cracker mixture into the bottom and up the sides of your tartlet pans. Make sure to pack it tightly to create a sturdy crust. Bake in the preheated oven for 8-10 minutes, or until lightly golden. Remove from the oven and set aside to cool slightly.
Step 3: Make the Chocolate Filling
While the crust cools, melt the chopped chocolate using a double boiler or in the microwave. If using the microwave, heat in 30-second intervals, stirring in between, until smooth. In a bowl, combine the evaporated milk, eggs, sugar, and vanilla extract. Whisk until well blended. Slowly fold the melted chocolate into the mixture until combined.
Step 4: Fill the Tartlet Shells
Pour the chocolate filling into each prepared tartlet shell, filling them about three-quarters full.
Step 5: Prepare the Meringue
In a clean mixing bowl, use a whisk to beat the egg whites and cream of tartar until soft peaks form. Gradually add the sugar and continue beating until stiff peaks form. The meringue should be glossy and hold its shape well.
Step 6: Top and Bake Again
Spoon the meringue over the chocolate filling, spreading it to cover completely. Use the back of a spoon to create peaks for a lovely presentation. Return the tartlets to the oven and bake for an additional 10-12 minutes, or until the meringue is lightly browned.
Step 7: Cool and Serve
Allow the tartlets to cool at room temperature before transferring them to the refrigerator to chill for at least 1 hour. Serve chilled or at room temperature for the perfect sweet treat!
Holiday-Friendly Variations
- Add peppermint extract to the chocolate filling for a festive holiday twist.
- Incorporate crushed nuts into the graham cracker crust for added texture.
- Top with a drizzle of salted caramel for an extra indulgent experience.
- Use white chocolate instead of dark chocolate for a sweeter flavor profile.
Learn from These Mistakes
- Don’t skip the refrigeration step! Chilling the tartlets ensures they set properly and enhances the flavors.
- Make sure your mixing bowls and utensils are completely clean when whipping the egg whites to achieve maximum volume.
- Keep an eye on the meringue while baking; it can go from perfectly browned to burnt in a matter of minutes.
- Be cautious with the filling; overfilling can cause it to overflow while baking.
Freezer-Friendly Notes
These Gluten-Free Smores Tartlets can be made ahead of time and frozen for later enjoyment. Once fully cooled, wrap them individually in plastic wrap and place them in an airtight container. To serve, simply thaw in the refrigerator overnight before enjoying.
Reader Questions
Can I substitute the dark chocolate with milk chocolate?
Absolutely! If you prefer a sweeter flavor, feel free to use milk chocolate instead of dark chocolate. Just keep in mind that it will change the overall taste and sweetness of the tartlets.
How long can I store these tartlets?
The Gluten-Free Smores Tartlets can be stored in an airtight container in the refrigerator for up to 3 days. If you freeze them, they can last for up to 2 months.
Is there a vegan alternative for this recipe?
Yes! You can use a vegan chocolate alternative, coconut cream instead of evaporated milk, and aquafaba (chickpea brine) instead of egg whites to create a vegan version of these tartlets.
Can I make these tartlets mini-sized?
Definitely! You can use a mini muffin tin to create bite-sized versions of these Gluten-Free Smores Tartlets. Just adjust the baking time accordingly to ensure they don’t overbake.
Ready to Cook?
Now that you have all the tools, tips, and tricks to make these delicious Gluten-Free Smores Tartlets, it’s time to roll up your sleeves and get cooking! Whether you’re sharing them with friends or enjoying them all to yourself, these tartlets are sure to impress. So gather your ingredients, follow the steps, and savor the delightful flavors of this gluten-free treat. Happy baking!
Gluten-Free Smores Tartlets
Ingredients
Equipment
Method
- Step 1: Prepare the Crust - Preheat your oven to 350°F (175°C). In a food processor, pulse the gluten-free graham crackers until they resemble fine crumbs. Transfer the crumbs to a mixing bowl and add the dark brown sugar and whipped unsalted butter. Mix until the mixture resembles wet sand.
- Step 2: Form the Tartlet Shells - Press the graham cracker mixture into the bottom and up the sides of your tartlet pans. Make sure to pack it tightly to create a sturdy crust. Bake in the preheated oven for 8-10 minutes, or until lightly golden. Remove from the oven and set aside to cool slightly.
- Step 3: Make the Chocolate Filling - While the crust cools, melt the chopped chocolate using a double boiler or in the microwave. If using the microwave, heat in 30-second intervals, stirring in between, until smooth. In a bowl, combine the evaporated milk, eggs, sugar, and vanilla extract. Whisk until well blended. Slowly fold the melted chocolate into the mixture until combined.
- Step 4: Fill the Tartlet Shells - Pour the chocolate filling into each prepared tartlet shell, filling them about three-quarters full.
- Step 5: Prepare the Meringue - In a clean mixing bowl, use a whisk to beat the egg whites and cream of tartar until soft peaks form. Gradually add the sugar and continue beating until stiff peaks form. The meringue should be glossy and hold its shape well.
- Step 6: Top and Bake Again - Spoon the meringue over the chocolate filling, spreading it to cover completely. Use the back of a spoon to create peaks for a lovely presentation. Return the tartlets to the oven and bake for an additional 10-12 minutes, or until the meringue is lightly browned.
- Step 7: Cool and Serve - Allow the tartlets to cool at room temperature before transferring them to the refrigerator to chill for at least 1 hour. Serve chilled or at room temperature for the perfect sweet treat!
Notes
- Chill the tartlets to ensure they set properly and enhance the flavors.
- Use clean bowls when whipping egg whites for maximum volume.
- Watch the meringue closely while baking to prevent burning.
- Avoid overfilling the tartlet shells to prevent overflow.