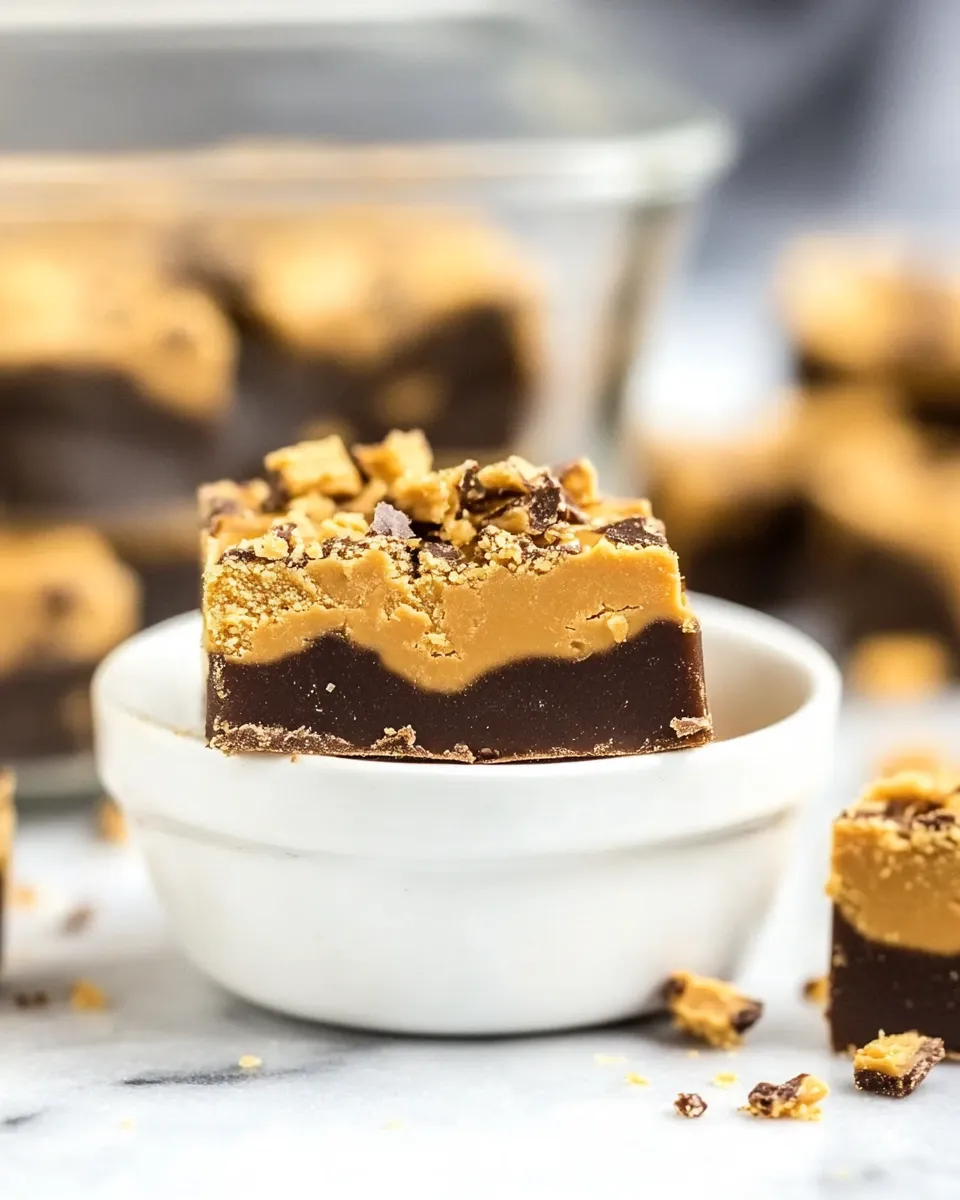
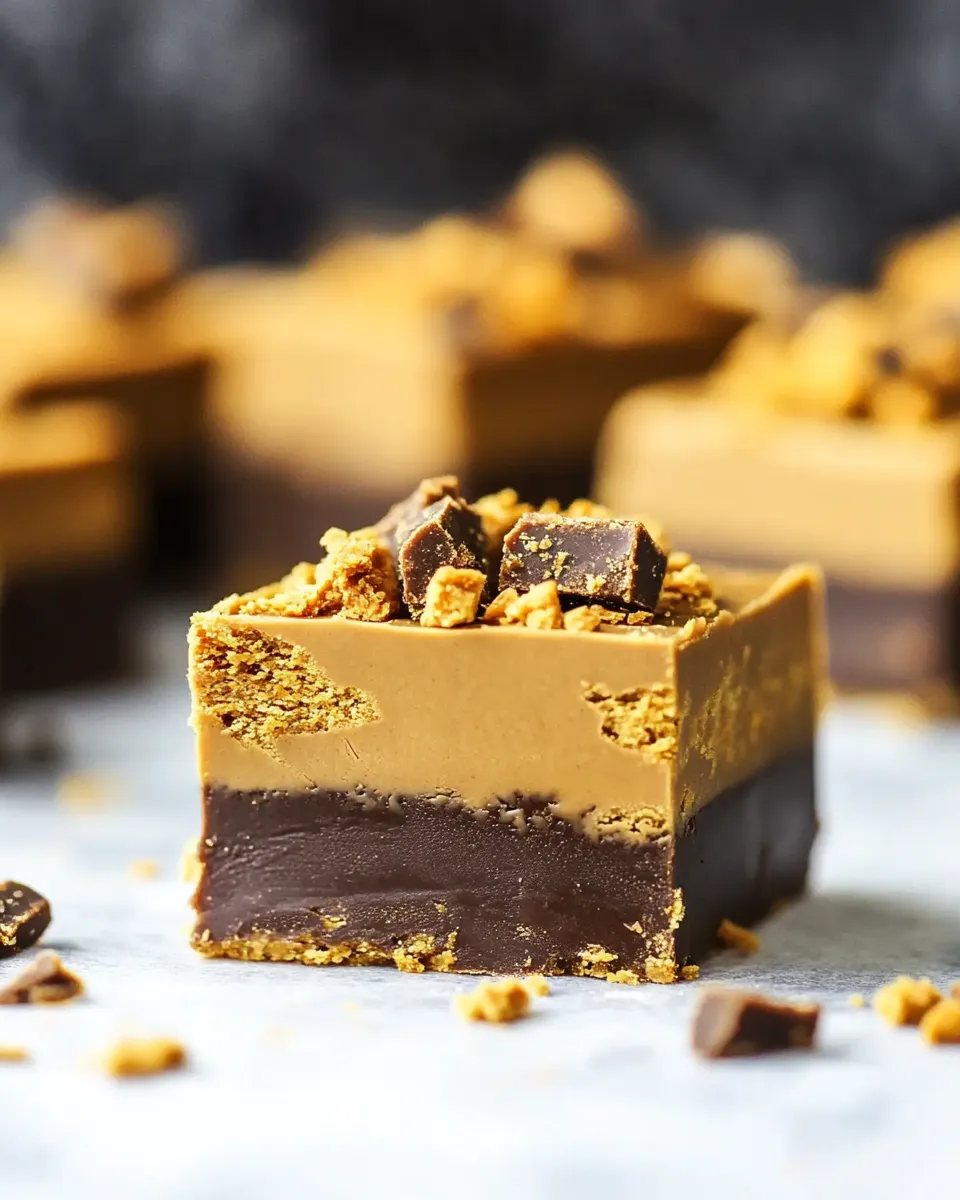
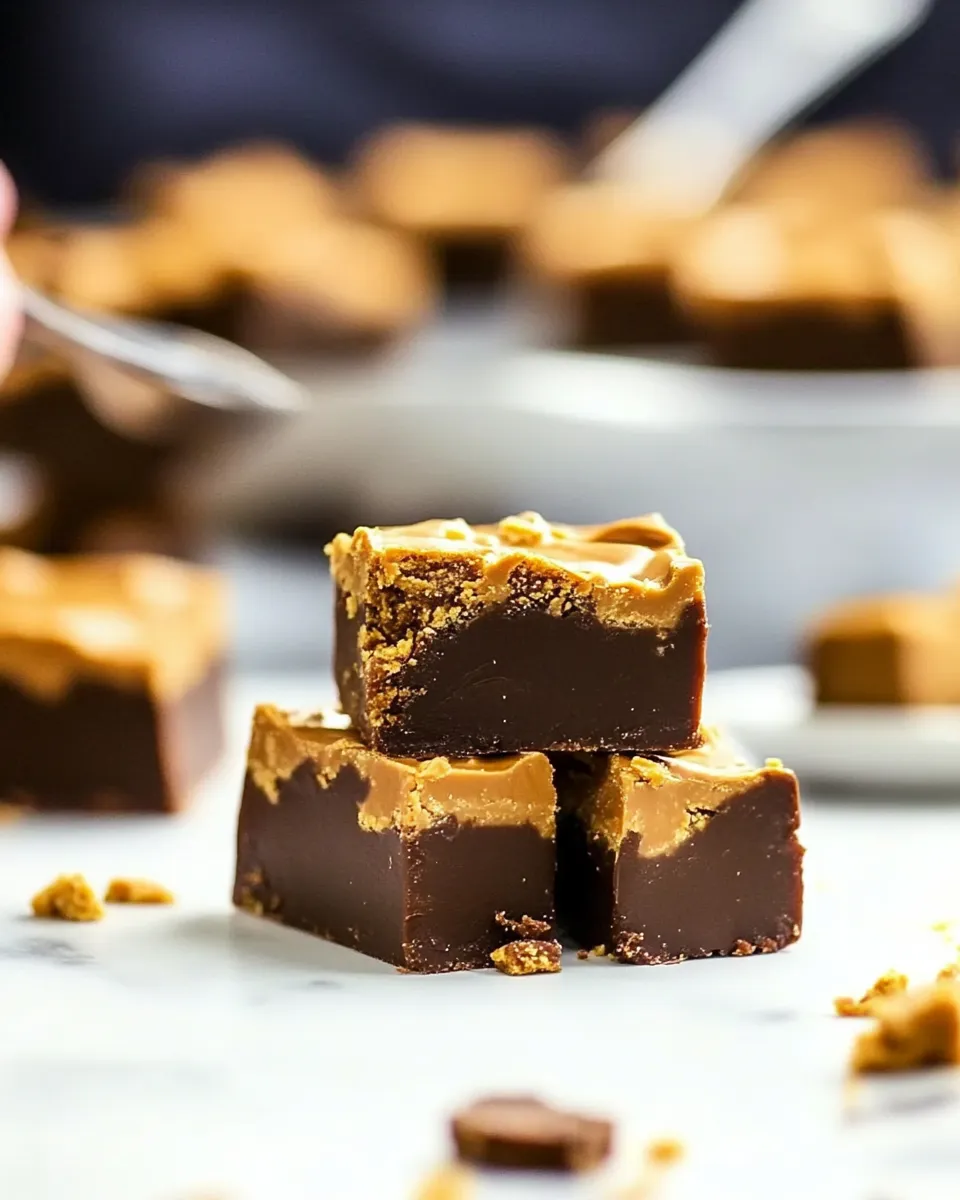
Easy Butterfinger Fudge
If you’re looking for a simple yet indulgent treat, look no further than this Easy Butterfinger Fudge. This delightful confection brings together smooth milk chocolate and creamy peanut butter, all while highlighting the nostalgic crunch of Butterfinger candy bars. It’s a crowd-pleaser that’s perfect for any occasion—whether you’re hosting a party, bringing a dish to a potluck, or simply treating yourself and your family. With just a handful of ingredients and a few easy steps, you’ll be enjoying this sweet, salty, and utterly satisfying fudge in no time.
Why I Love This Recipe
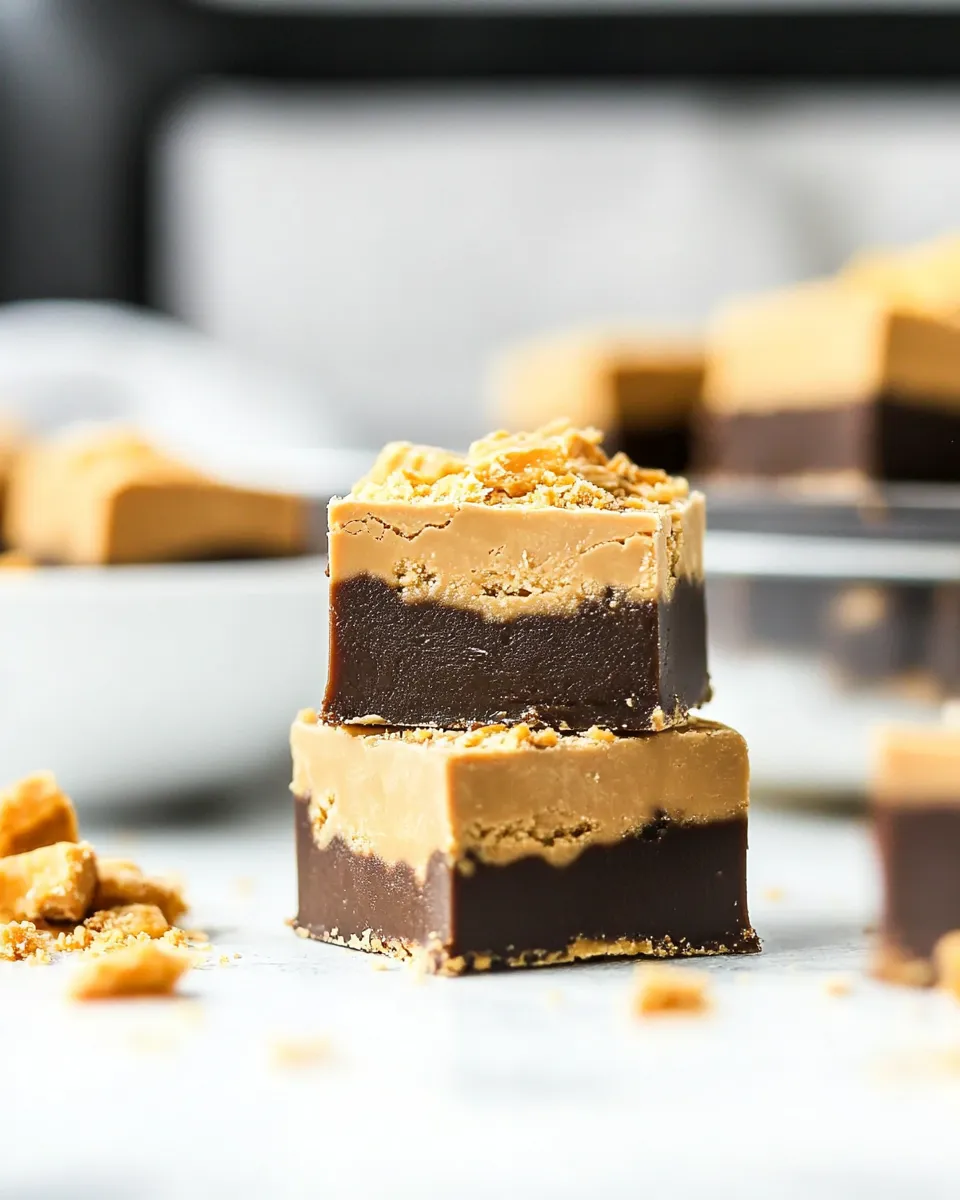
There’s something magical about the combination of chocolate and peanut butter that makes my taste buds dance with joy. When you add in the crispy, crunchy bits of Butterfinger, it elevates this Easy Butterfinger Fudge to a whole new level. Not only does this recipe require minimal effort, but it also yields a deliciously rich treat that can be made ahead of time and stored for later. Plus, who doesn’t love a dessert that can be prepared in just a few simple steps?
Your Shopping Guide
Before you dive into making your fudge, here’s a handy shopping list to gather all the ingredients you’ll need:
- 3 cups milk chocolate chips – The star of the show! Look for high-quality chocolate chips for the best flavor.
- 1 (14-ounce) can sweetened condensed milk – This is what gives your fudge its creamy texture.
- 1 teaspoon vanilla extract – A touch of vanilla adds depth to the chocolate flavor.
- 1 cup creamy peanut butter – Choose a good-quality peanut butter that’s smooth and easy to mix.
- 1 teaspoon salt – Balances the sweetness of the fudge and enhances the flavors.
- 20 Butterfingers fun-sized candy bars – These will be chopped and mixed into the fudge for that signature crunch.
Cook’s Kit
To make this Easy Butterfinger Fudge, you’ll need a few essential tools:
- Medium saucepan – For melting the chocolate and mixing the ingredients together.
- Wooden spoon or spatula – For stirring the fudge mixture smoothly.
- 9×9-inch baking dish – To set the fudge and allow it to cool.
- Parchment paper – For lining the baking dish, making it easier to remove the fudge later.
- Sharp knife – To cut the fudge into neat squares once it’s set.
Easy Butterfinger Fudge: How It’s Done
Making this Easy Butterfinger Fudge is as simple as it gets! Follow these steps for a fail-proof fudge experience:
Step 1: Prepare Your Baking Dish
Line a 9×9-inch baking dish with parchment paper, allowing some overhang on the sides for easy removal later. This will ensure that your fudge comes out cleanly and easily.
Step 2: Melt the Chocolate Mixture
In a medium saucepan, combine the milk chocolate chips and sweetened condensed milk over low heat. Stir occasionally until the chocolate chips are completely melted and the mixture is smooth and creamy.
Step 3: Add Peanut Butter and Vanilla
Once the chocolate mixture is melted, remove it from the heat. Stir in the creamy peanut butter and vanilla extract until fully incorporated and smooth. The mixture will be thick and luscious!
Step 4: Incorporate the Salt and Butterfingers
Add the salt to the fudge mixture and stir well. Next, chop 10 of the Butterfinger candy bars into small pieces and fold them into the fudge, ensuring they are evenly distributed throughout.
Step 5: Pour and Set
Pour the fudge mixture into the prepared baking dish, spreading it evenly with a spatula. Chop the remaining 10 Butterfinger bars and sprinkle them generously on top of the fudge for added crunch and decoration.
Step 6: Chill Until Firm
Refrigerate the fudge for at least 2 hours, or until it is firm enough to cut. Once set, use the parchment paper overhang to lift the fudge out of the dish.
Step 7: Cut and Serve
Use a sharp knife to cut the fudge into squares. Serve immediately or store for later enjoyment. This fudge is sure to impress!
Smart Substitutions
If you want to try variations or have dietary preferences, consider these substitutions:
- For a dairy-free option, use dairy-free chocolate chips and coconut milk.
- If you prefer crunchy peanut butter, feel free to swap it for the creamy variety for an extra crunch.
- For a nut-free version, substitute sunflower seed butter for the peanut butter.
- Swap out Butterfinger bars with any other crunchy candy bar, like Reese’s or Twix, for a different flavor profile.
Testing Timeline
Timing is key to creating the perfect Easy Butterfinger Fudge:
- Preparation Time: 10 minutes
- Cooking Time: 10 minutes
- Chilling Time: 2 hours (or longer, if desired)
- Total Time: Approximately 2 hours and 20 minutes
Keep It Fresh: Storage Guide
To keep your Easy Butterfinger Fudge fresh and delicious, follow these tips:
- Store the fudge in an airtight container at room temperature for up to 1 week.
- For longer storage, keep the fudge in the refrigerator, where it will last up to 2 weeks.
- You can also freeze the fudge! Wrap individual pieces in plastic wrap and place them in a freezer-safe bag for up to 3 months. Thaw at room temperature before serving.
Ask the Chef
Can I use dark chocolate instead of milk chocolate?
Absolutely! Dark chocolate will add a richer flavor to your fudge. Just keep in mind that it will alter the overall sweetness, so you may want to adjust the amount of sweetened condensed milk if you prefer a sweeter fudge.
What if I don’t like peanut butter?
No problem! You can substitute the peanut butter with any nut or seed butter of your choice. Almond butter or sunflower seed butter are great alternatives that will still yield a delicious fudge.
How can I make this fudge more festive?
For a festive touch, try adding sprinkles on top of the fudge before it sets. You can also drizzle melted white chocolate over the top for an eye-catching presentation.
Can I double the recipe?
Yes! If you want to make a larger batch, simply double the ingredients and use a larger baking dish. Just be sure to adjust the chilling time accordingly, as it may take longer to set.
Save & Share
If you love this Easy Butterfinger Fudge as much as I do, don’t forget to share it with your friends and family! It’s perfect for gatherings and celebrations, and I promise it will be a hit. Snap a photo of your fudge and tag me on social media—I’d love to see your creations!
This Easy Butterfinger Fudge is not just a treat; it’s an experience that brings back childhood memories while satisfying your sweet tooth. With every bite, you’ll enjoy the rich chocolate, creamy peanut butter, and the delightful crunch of Butterfingers. So, what are you waiting for? Gather your ingredients, follow the steps, and indulge in this scrumptious fudge today!
Easy Butterfinger Fudge
Ingredients
Equipment
Method
- Line a 9x9-inch baking dish with parchment paper, allowing overhang for easy removal.
- In a medium saucepan, combine milk chocolate chips and sweetened condensed milk over low heat. Stir until melted and smooth.
- Remove from heat and stir in peanut butter and vanilla until smooth.
- Add salt and fold in chopped Butterfinger pieces until evenly distributed.
- Pour fudge into prepared baking dish, spreading evenly. Sprinkle remaining chopped Butterfinger on top.
- Refrigerate for at least 2 hours or until firm. Use parchment to lift out and cut into squares.
- Serve immediately or store for later enjoyment.
Notes
- Store fudge in an airtight container at room temperature for up to 1 week.
- For longer storage, refrigerate for up to 2 weeks.
- Wrap individual pieces for freezing; lasts up to 3 months.